chapter two: initial planning
Destination Research
Professional travel photographers don’t usually just show up at a destination and start shooting. It’s likely that they have spent considerable time researching the destination, developing a list of locations (a “shot list”) that they need to include in their photo submittals, identifying special events that are happening in the area, and jotting down sunrise and sunset times. Often, they will have local contacts (“fixers”) to help them plan out the logistics of their shoot or will have gone back to the same destination multiple times, building on their knowledge and experiences to be at the right place at the right time.
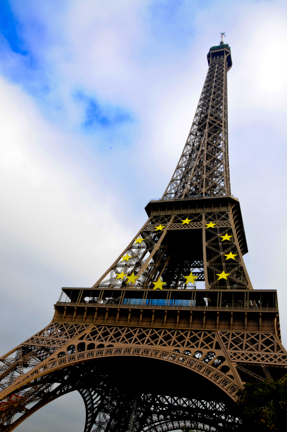
You can do many of the same things. If it’s your first time in Paris, it’s good to purchase or download a guidebook to the city and think about where you will want to visit: the Eiffel Tower, Notre Dame Cathedral, the Louvre, and the Jardin de Luxembourg among others. The list will primarily be for places to visit but will also help you start the second list - places you may want to photograph – images that could be your “icon” shots. If the Eiffel Tower is on my “icon list,” then I might try to plan the day around being there an hour to two before sunset if that works well with the overall itinerary for the day. I would try to avoid being there in midday with harsh light, a potentially boring sky, let alone the likely long lines awaiting the trip up. I might actually schedule two trips there, the first as a “tourist” with an eye for a later visit as a “photographer.” The first visit allows me to look around the area and explore for other possible shots at a later time. If circumstances dictate a midday excursion up the tower, so be it (and good photos are still possible even in midday light).
Professional travel photographers don’t usually just show up at a destination and start shooting. It’s likely that they have spent considerable time researching the destination, developing a list of locations (a “shot list”) that they need to include in their photo submittals, identifying special events that are happening in the area, and jotting down sunrise and sunset times. Often, they will have local contacts (“fixers”) to help them plan out the logistics of their shoot or will have gone back to the same destination multiple times, building on their knowledge and experiences to be at the right place at the right time.
You can do many of the same things. If it’s your first time in Paris, it’s good to purchase or download a guidebook to the city and think about where you will want to visit: the Eiffel Tower, Notre Dame Cathedral, the Louvre, and the Jardin de Luxembourg among others. The list will primarily be for places to visit but will also help you start the second list - places you may want to photograph – images that could be your “icon” shots. If the Eiffel Tower is on my “icon list,” then I might try to plan the day around being there an hour to two before sunset if that works well with the overall itinerary for the day. I would try to avoid being there in midday with harsh light, a potentially boring sky, let alone the likely long lines awaiting the trip up. I might actually schedule two trips there, the first as a “tourist” with an eye for a later visit as a “photographer.” The first visit allows me to look around the area and explore for other possible shots at a later time. If circumstances dictate a midday excursion up the tower, so be it (and good photos are still possible even in midday light).
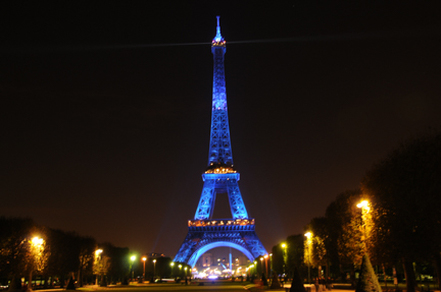
When I spent a week in Paris, my wife and I stayed on the Rue Clare, less than a 15 minute walk to the grounds of the Eiffel Tower – and we walked over there almost every evening to see the lights of the Tower – and I photographed it from various angles. My favorite shot, though, was taken in late afternoon when we happened to be there after a day’s walking and metro’ing around Paris. The angle of the shot needed just a blue sky to complete the image which thankfully was provided by Mother Nature. The subject was a given for my trip to Paris. The timing of the shot and the composition of the shot came while there – not planned out in advance. But, it still came out to my satisfaction, which is what matters in the end.
And given our proximity to the Eiffel Tower, night shots were also in the offing, such as the one below.
And given our proximity to the Eiffel Tower, night shots were also in the offing, such as the one below.
As you plan your itinerary and your “icon” shot list, it’s obvious that you need to take into account the season when you will be visiting. A trip to New England would not be complete for many without several photographs of gold and red leaves – if you’re there during the peak of the fall. If you are going to be there in the summer, then forget about the “fall leaves” and focus your attention on something else – the Lobster shacks along the Maine coast, for instance, or Boston’s Freedom Trail.
Most travel guides include photographs that not only illustrate a locale, but may also give you ideas for photographs. Google Maps is a good source not just for maps, but of photos of places far and near. These are great for ideas. Many photographers passing through Hernandez, New Mexico try find the exact spot (more or less) where Ansel Adams took his famous photograph, “Moonrise over Hernandez, New Mexico.” Duplicating the photograph now is impossible due to new buildings, tree growth, not to mention that the light and the moon are not likely the same as when Ansel was there. And as he says in his autobiography, it wasn’t a shot planned well in advance; rather it was the serendipity of driving along this road at that particular moment in time and seeing the image before him. With his 8x10 view camera taking time to set up, he ended up with enough time for just one shot – a truly iconic shot. He, of course, was completely familiar with his equipment and was able to quickly compose and take the photograph before the light changed. Later on, we’ll talk about taking an iconic view and making it your own. No one needs to take another photo just like Adam’s Moonrise shot – it’s already available (for a price!). You need to take a photo that is truly “yours.”
Cultural Considerations
Travel, whether within the U.S. or international, often involves interacting with different cultures. Interactions with the “locals,” even when saying “hi” or queuing for entrance to a theater or at a bus stop, can differ across a state, a nation, and most especially, the world. Putting a camera between you and the “locals” can add another dimension as well as be a point of tension.
So as you plan your trip, determine if there are cultural or governmental issues that you need to be aware of when photographing people and places – yes, places. In many countries there are restrictions – formal and informal – about photographing the obvious – military installations – and the less obvious – bridges, railroad stations, police precincts, airports, and even ferries and ferry docks.
Within countries, there are ethnic and tribal groups that have their own standards that should be respected. The pueblos of the American Southwest, for instance, have limits on photography within their jurisdiction, especially when pueblo residents are involved. There are usually license fees for use of your camera equipment as well. Formal gardens often have camera fees and restrictions on how photographs taken on their grounds can be used – for instance, no commercial use. Many guidebooks provide an overview of such prohibitions; there are also books and websites, usually country-specific, devoted to cultural norms.
Individuals
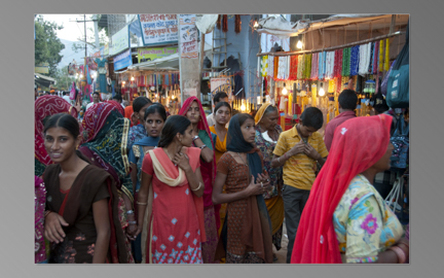
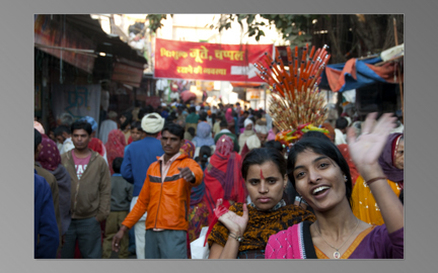
Americans love their personal space – get within 4 feet of us when you don’t know us and you’re clearly “invading” our space. In India, it is more like 4 inches. I found that in Rajasthan (the westernmost state in India), I could just stand on a sidewalk and take all the photos I wanted of people walking toward me and they would just flow around me. The key here was to keep taking photos and hope for serendipity as in this sequence. I can’t imagine doing the same in most American cities, though some street photographers certainly do. A crowded street scene, such as these in Pushkar, Rajasthan, can be illustrative of local conditions; with a little luck and patience, a more interesting image may emerge, such as the 2nd shot with the young woman waving (and the suspicious eye of the gentleman in orange). Oftentimes, when people know you are taking their photograph they act more “posed” and are less appealing photographically. But the spontaneous wave in this instance was the spark that made an ordinary photograph much more interesting and appealing.
Americans love their personal space – get within 4 feet of us when you don’t know us and you’re clearly “invading” our space. In India, it is more like 4 inches. I found that in Rajasthan (the westernmost state in India), I could just stand on a sidewalk and take all the photos I wanted of people walking toward me and they would just flow around me. The key here was to keep taking photos and hope for serendipity as in this sequence. I can’t imagine doing the same in most American cities, though some street photographers certainly do. A crowded street scene, such as these in Pushkar, Rajasthan, can be illustrative of local conditions; with a little luck and patience, a more interesting image may emerge, such as the 2nd shot with the young woman waving (and the suspicious eye of the gentleman in orange). Oftentimes, when people know you are taking their photograph they act more “posed” and are less appealing photographically. But the spontaneous wave in this instance was the spark that made an ordinary photograph much more interesting and appealing.
Overall, most people are tolerant of others taking their photograph (subject to the cultural prohibitions previously discussed). Don’t hesitate to ask for permission, especially if you are unsure. Often, this can begin as a simple interaction with an individual – hello, how are you, etc. After a brief (or longer) period, with your camera by your side, you can bring up the issue of photographing them. Folks who may have been hesitant may be more likely to agree if a courteous relationship has been established. And if they say “no,” thank them anyway and move on.
Basic rule – if someone says “no,” then do not take their photograph. The “no” can be verbal or physical (covering their face or pointing away or shaking their head, though the latter in some countries in the Balkans and Middle East, means “yes!”) but the reply should always be respected.
There are also those who believe that it’s better to take the photograph and ask for forgiveness, then to risk a “no” answer beforehand. Telephoto lenses make this task easier, as long as you’re within the cultural norms of an area. For instance, if you are on a Native American reservation that prohibits photos of tribal members, then use of a telephoto lens from a long distance away is still wrong even if you can get away with it. It will make it harder on the next photographer who comes along when the trust is broken.

Some subjects will ask for payment – usually a dollar or two, sometimes higher depending on the circumstances. It’s up to you whether you want to agree to this. Generally speaking, I don’t pay and don’t take the photograph, and I never pay if I’m asked for money AFTER taking the photograph. If you do pay, agree in advance for what you’re paying for – one click of the shutter or a series of photographs. On a recent trip to the Omo Valley tribal areas in southern Ethiopia, there were certain tribes that had well established fees for taking photographers - either a village-wide fee that was then split among the villagers - or a standard per-person fee. The former was certainly an easier environment where the residents didn't feel a need to "pose" to get paid, resulting in more casual, spontaneous photographs. The latter was all about posing and getting paid. Sure I participated, but the images were much less compelling.
Most subjects, especially kids, love to see the photos on your digital screens after you’ve taken them. Some people will ask you to send them a copy of the photograph, via regular mail or, more commonly these days, e-mail. I always agree to do so. It makes them more enthusiastic to participate and makes me feel good to share an image with them. Just be sure to get the address written down correctly and make a note of who-is-who so that the right photo gets to the right person.
I won’t spend much time discussing model releases other than to mention that if you think you will want to sell your photographs for commercial purposes (such as advertising), a model release may well be required by your end client. Some photo competitions also require model releases if there are recognizable individuals in the photograph. For more information on the specifics of model releases, see the following websites:
· http://www.betterphoto.com/article.asp?id=37
· http://en.wikipedia.org/wiki/Model_release
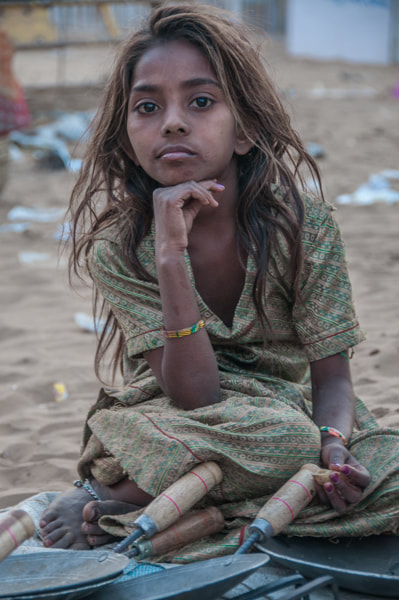
What is more likely to happen is that the person will be happy to have their photo taken. I spent perhaps fifteen minutes with this young girl and her family, itinerant salespeople at the Pushkar Mela in Rajasthan. Not sharing a common language, they were still interested in what I was doing and in being photographed. The young girl, in particular, was relaxed and struck several poses totally on her own. And those eyes! This photograph was not planned, was not on my “icon” list, but has become one of my five favorites from the India journey.
Now on for a discussion of equipment in Chapter 3.
Most subjects, especially kids, love to see the photos on your digital screens after you’ve taken them. Some people will ask you to send them a copy of the photograph, via regular mail or, more commonly these days, e-mail. I always agree to do so. It makes them more enthusiastic to participate and makes me feel good to share an image with them. Just be sure to get the address written down correctly and make a note of who-is-who so that the right photo gets to the right person.
I won’t spend much time discussing model releases other than to mention that if you think you will want to sell your photographs for commercial purposes (such as advertising), a model release may well be required by your end client. Some photo competitions also require model releases if there are recognizable individuals in the photograph. For more information on the specifics of model releases, see the following websites:
· http://www.betterphoto.com/article.asp?id=37
· http://en.wikipedia.org/wiki/Model_release
What is more likely to happen is that the person will be happy to have their photo taken. I spent perhaps fifteen minutes with this young girl and her family, itinerant salespeople at the Pushkar Mela in Rajasthan. Not sharing a common language, they were still interested in what I was doing and in being photographed. The young girl, in particular, was relaxed and struck several poses totally on her own. And those eyes! This photograph was not planned, was not on my “icon” list, but has become one of my five favorites from the India journey.
Now on for a discussion of equipment in Chapter 3.