chapter 5: special situations
While traveling, some things are well planned, others spontaneous; serendipity presents itself; some golden opportunities arise, and some challenges appear as well. Responding appropriately from a photographic standpoint will result in better photographs, more variety, and less frustration.
Night Photography
Night Photography
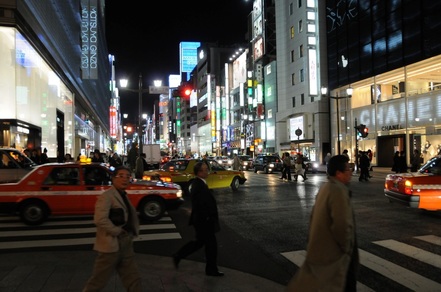
With vibration reduction technology and higher ISO settings available in modern DSLRs, night photography is possible without tripods in a number of instances [though long time exposures still require a tripod or another way of stabilizing the camera (bean bags, porch rails) to minimize or eliminate shaking]. Neon lights are great – colorful, bright, easy to photograph. And, of course, the lights of Broadway or Tokyo’s Ginza district are there for the taking, so to speak. Yes, with higher ISO there may be more “grain” in the image, but you can make that work for you as well. And you can also reduce the grain during the post-processing phase in many instances.
As I said earlier, I rarely use a tripod and yet have a number of great night shots. You can too.
As I said earlier, I rarely use a tripod and yet have a number of great night shots. You can too.
Take Advantage of Time of Day
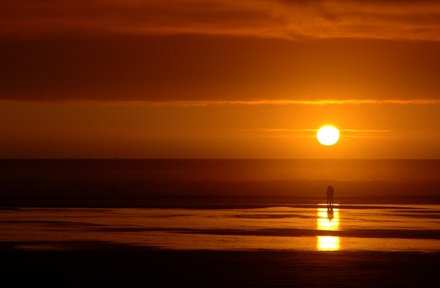
Oftentimes we don’t have the luxury of time to coming back to a location at the best time of day light-wise. We’re often moving on and can’t afford the luxury of not shooting midday, when the light is often harsh and at its worst when it comes to landscapes and other outdoor shots. When possible, though, it’s great to be doing your outdoor shots from dawn to an hour or so past sunrise and then again from an hour or two before sunset through dusk. Light and shadows and clouds are key components to wonderful landscapes and a good portion of such photos are shot during the dawn and dusk periods.
Oftentimes we don’t have the luxury of time to coming back to a location at the best time of day light-wise. We’re often moving on and can’t afford the luxury of not shooting midday, when the light is often harsh and at its worst when it comes to landscapes and other outdoor shots. When possible, though, it’s great to be doing your outdoor shots from dawn to an hour or so past sunrise and then again from an hour or two before sunset through dusk. Light and shadows and clouds are key components to wonderful landscapes and a good portion of such photos are shot during the dawn and dusk periods.
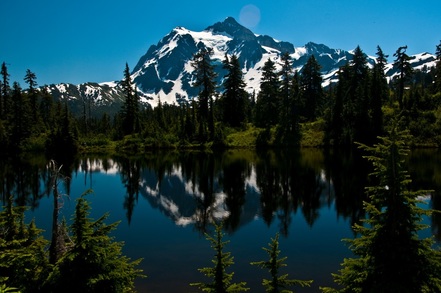
BUT, you are where you are when you’re there (did Yogi Berra say that?) and perfectly good shots can be taken even midday. A polarizer can pop out the blues of the sky. This photograph of Mount Shuksan in the North Cascades was taken late morning on a perfectly clear day and turned out great. Overcast days are a different story; avoid including the sky or minimize it when possible in such instances during midday when it appears as just a white blob in your image. Keeping in mind the time of day and what images are ideal given the “light of day” will assist in creating photos that you can be proud of.
Take Advantage of Miracles
Take Advantage of Miracles

Serendipity is my favorite photo situation. Never planned, the image just appears before you and you take full advantage of it. Clearly having your camera at the ready helps. The circumstances usually exist for only a few moments or a few minutes, whether a rainbow or sunset or the right combination of person and place. I’ve missed such shots by not having ANY camera with me but I’ve also taken full advantage of such moments when I have had a camera. Rainbows are always a popular subject for photographers. And in most instances, a polarizing filter brings out more of the color and can darken the clouds at the same time. This photograph was taken in County Clare, Ireland, after a passing rain.

This is an instance when it’s good to “always be ready.” I was sitting and resting midmorning near Rajasthan’s Lake Pushkar, with camera in lap, when I saw these sadhus (Hindu Holy Men) rapidly approaching. Had time for just one shot – and it was all I needed.
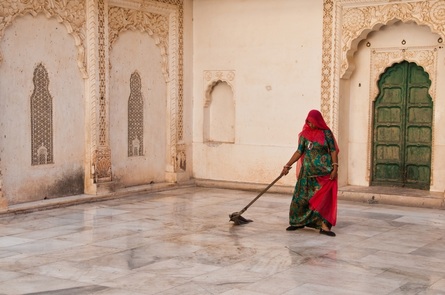
This shot, taken in Jodhpur, India, was a quick grab shot as I was walking through the courtyard of the Fort. It wasn’t until I saw the photograph later that evening on my laptop that I realize what I had actually captured – the red of the headscarf and dress, the green of the dress and door, and the subtle detail of the walls and floor - and was awed by it.
What’s Unique?!
There are thousand, perhaps tens of thousands of photos taken EVERY DAY of famous sites such as the Eiffel Tower, Lincoln Memorial, and the Old Faithful geyser. Many of these, of course, are taken with smart phones and posted immediately to Facebook or sent via e-mail – Here I Am in Paris, Washington D.C., or Yellowstone. And many others are taken with more traditional cameras but are “ordinary” in that they are like the other thousands of shots taken daily. As a travel photographer, your goals is not duplication but creating your own composition that’s out of the ordinary.
There are thousand, perhaps tens of thousands of photos taken EVERY DAY of famous sites such as the Eiffel Tower, Lincoln Memorial, and the Old Faithful geyser. Many of these, of course, are taken with smart phones and posted immediately to Facebook or sent via e-mail – Here I Am in Paris, Washington D.C., or Yellowstone. And many others are taken with more traditional cameras but are “ordinary” in that they are like the other thousands of shots taken daily. As a travel photographer, your goals is not duplication but creating your own composition that’s out of the ordinary.
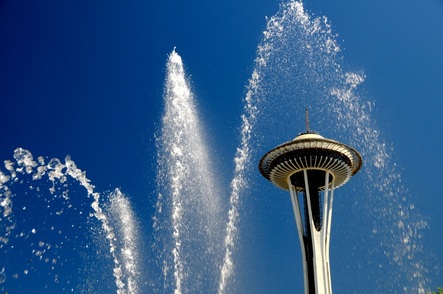
Wandering around the Seattle Center one glorious summer day (yes, Seattle has those from time to time), with the Space Needle nearly always in view, I “saw” this image opening up before me. The International Fountain was going strong and its spray created a frame around the Space Needle. I composed several shots – horizontal and vertical – experimenting with how to best frame the image for a “unique” photograph. And given Seattle’s reputation for rain, it was a perfect juxtaposition of Space Needle, blue sky, and the “rain” from the fountain.
Remember, your “eye” is unique; you can and do see things differently than anyone else and can come up with unique photos even of the most common subjects. Just open your eyes and be moved by opportunities and your unique affinity to the place.
As an aside, photography in popular tourist areas presents the problem of strangers taking over a scene – people everywhere, especially between you and the subject! Just think of all the photographs that you are in as an “in the way” stranger. I often wait until the crowd moves on or climb up on something to shoot above the crowd. Or I work hard to incorporate the crowd into the photograph in an “artistic” manner.
Architecture
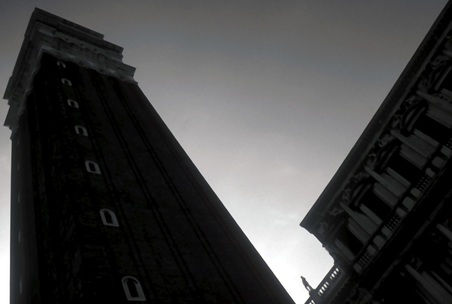
The architectural photography that you see in design and architecture magazines are often taken with either medium or large format cameras or with specialty lenses that allow for in-camera correction of straight lines. While your mind corrects what the eye sees to show the buildings walls are straight (OK, there are exceptions like the Leaning Tower of Pisa and works by Frank Gehry), the camera records what “it sees.” For those with more generally available and affordable equipment, you just need to recognize the inherent problem of concave lines and use that as part of the image – either exaggerating it or, more likely, using it to your advantage. The key is to make sure that one line – the base, either wall or the top of the building is parallel to one side of the image. This photo, taken of the Campanile in Plaza San Marco, Venice, does just that – keeps one line parallel and doesn’t worry about the rest.
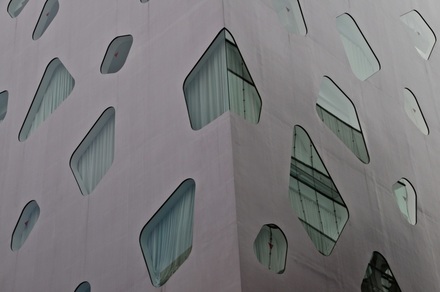
Another strategy with buildings is to show detail rather than trying to get the whole building in the shot (good luck with the Empire State Building, for instance). This shot of a retail/office building in Tokyo’s Ginza district zeroes in on what makes the building unique – its windows.
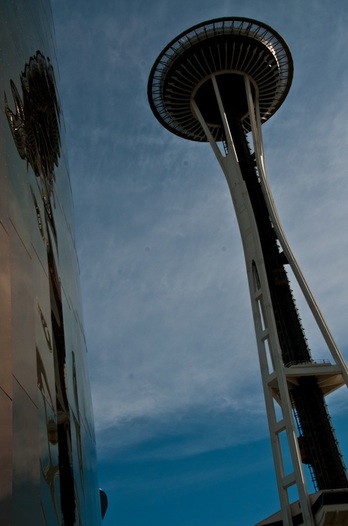
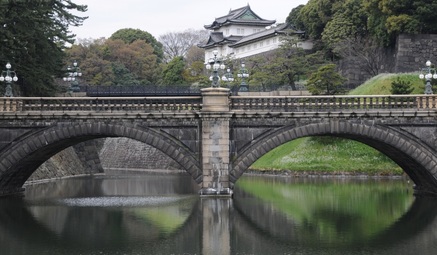
You can also go with reflections such as this [hotograph of the Space Needle) or other compositional techniques where you don’t need to be as concerned about parallel lines.
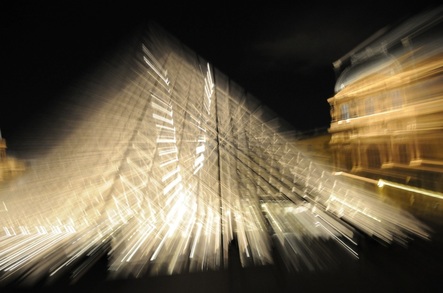
You can also bring architecture to life. Here are two photos of I.M. Pei’s Pyramid at the Louvre in Paris - one exterior and one interior.
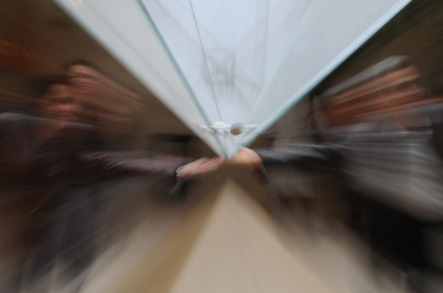
Both are the result of a slow shutter speed (1/6 of a second for the exterior photo; ¼ of a second for the interior shot) and zooming the lens during the shot, bringing life to the simple structure that serves as the entrance space to this incredible and at times overwhelming museum.
One final comment – taking photos of doors, porches, etc., can be an enjoyable pursuit, especially in older towns and cities. The Nantucket Island photographs discussed in the previous chapter do require that you take a bit of time and square up the lines as much as possible in camera, since most door and porches are pretty much at eye level. Frame the image as straight as possible, using the grid screen if your camera has one or using a tripod if you happen to have one. You can, of course, make minor adjustments during post-processing but it’s important to start with a pretty straight image to begin with since post-processing adjustments will inevitably result in the need to recrop the image, losing the outer edges of the original shot.
Sometimes it’s the Title
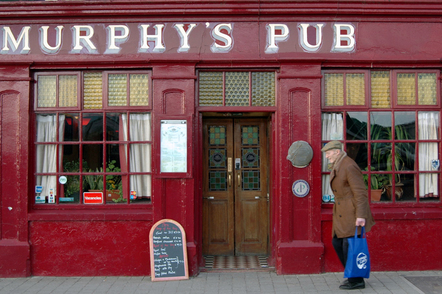
I’m not much of a “caption” person, relying on the image itself to tell the story. But there are times when a caption can add to a photo, sometime even in a comedic way. Take for instance this photograph of a gentleman approaching a pub in Dingle Town, County Kerry, Ireland. “Another Day, Another Guinness” just seems appropriate in this instance.
Festivals, Performances
I love attending music and dance festivals, whether near home, such as the Northwest Folklife Festival in Seattle, or far away, including the Kaustinan (Finland) Folk Music Festival or the Llangolen Eisteddfod (Wales). I always go with the best intentions to take great photos and I always find it a challenge.
Most of the events are either outdoors, under an awning of some type, or under a tent with poor light levels. The backgrounds are usually either dominated by a sponsorship banner, a white tent wall, or there’s nothing at all in back separating the performers from the crowds. While an overall environment shot is possible (crowd, stage, performers) it’s usually pretty busy.
Getting “up close and personal” is usually the best strategy, especially if it allows you to minimize background interference, though you also need to make sure that the ceiling or backstage elements are not distraction. Musicians, dancers, and other performers move a lot, whether just their hands or their whole bodies. A fast shutter speed is often necessary to “stop motion.” I actually prefer a slower shutter speed that shows “some motion,” conveying that there’s action here, not a staid, staged portrait. Digital photography, of course, lets you experiment with shutter speeds to see what works best in a given situation. One of the joys of digital is being able to check on your photos as you shoot and make adjustments to shutter speed, aperture, ISO, white balance and other settings as required.
Lighting is usually an issue with capturing the right image of performers, whether indoors or out. Flash photography is at best frowned upon and often prohibited. Given the distance you typically are from the performers, flash is usually worthless as well. By shooting in RAW format, you can do a lot of lighting adjustments during post-processing, so I don’t typically worry much about lighting. Slightly overexposing the shots allows the “chip” to record more information that can then be used during the post-processing efforts. It’s more difficult to bring out detail in an underexposed shot, since less light or duration of light has reached the sensor.
Indoor events are actually the easiest to shoot. If you’re sitting down, you have a little more control over the stability of your camera and lens; the stage lighting is usually much better than at an outdoor stage; you are typically at a higher elevation than the performers allowing a good overall view of the stage and allowing you to avoid photos of the “lights.” But there’s also the likelihood that you will be further from the stage, so a zoom lens or a fixed telephone lens is usually needed to isolate the performers.
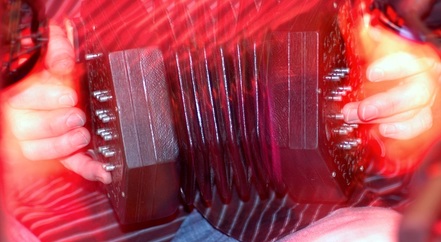
With musicians, most of the action is in the hands. I love getting closely cropped images of a musical instrument and the performer’s hands with at least a little motion in the hands and sometimes even the instrument. This photo of Noel Hill, one of Ireland’s premier concertina masters and a great instructor to boot, is one of my favorites and appears on his newest CD – motion, color, intensity – defining both the playing and the resultant photograph.
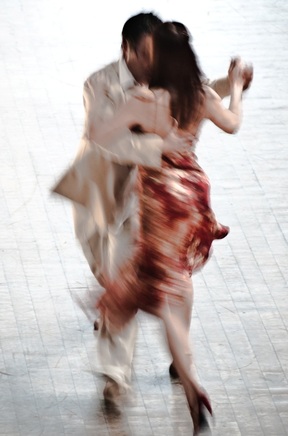
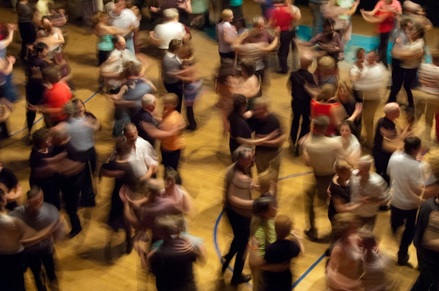
With dancers, the most noticeable feature is often the colors – the colors of the women’s dresses, “traditional” or “native” attire, headgear, scarves, ribbons, jewelry, and other accoutrement – all enhance the images, whether static or showing motion. The challenge involves the movement of the dancers. Usually there are multiple performers in lines or circles. Getting the right shot that doesn’t have a face partially blocked or an extremity partially out of the frame or having a microphone, speaker or other element in the photo that detracts from the image usually requires multiple shots and a little bit of luck and a bit of timing! Find the “shot,” frame the image as you want it and wait for the right moment! This photograph of Tango dancers at Northwest Folklife emphasizes color and motion against a washed out dance floor (taken indoor with bright sunlight through skylights).
Motion again was a key element of this photograph of set dancers in Ireland and required experimenting with various shutter speeds to get just the right amount of motion and yet retain expressions.
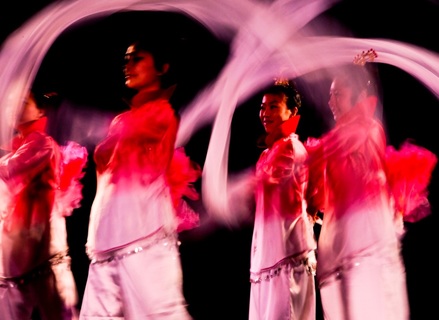
And keeping the motion theme alive, this photograph of Korean Dancers, this time at an indoor stage with a black background, was timed for a combination of motion in the streamers and the stillness of the dancers themselves.

Also check out the venue and see if there’s a location, often a balcony, which allows you a “perch” to isolate performers. This photograph of Tango dancers was taken from a 2nd floor balcony overlooking a dance floor. The floor was surrounded by audience members; the images I envisioned were very focused on the dancers – the sensuality of the Tango – and combined with observers (the audience) would have been a visual distraction. A zoom lens and a high perch, plus the ever changing light in the space (artificial lighting coupled with windows and skylights on a sunny day) provided lots of opportunities and challenges in getting just the right images.
Artists
Artists
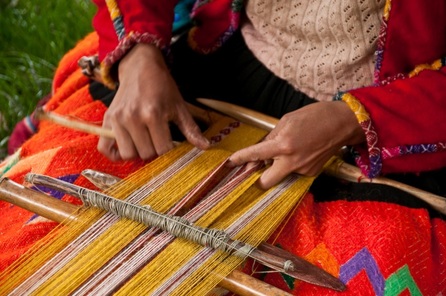
Whether at festivals, the county fair, or at an artist studio, the artists themselves make great photo subjects. Three elements are important: the artist, their hands and their artwork. An environmental shot, showing the artist as work in his or her studio or space, is a nice start. Coupling that with detail shots of their hands with the tools of their trade (brushes, knives, or looms, for instance) can make for a nice series of shots. This photograph of a weaver in Peru’s Sacred Valley shows both the weaving pattern and the artist’s hands.
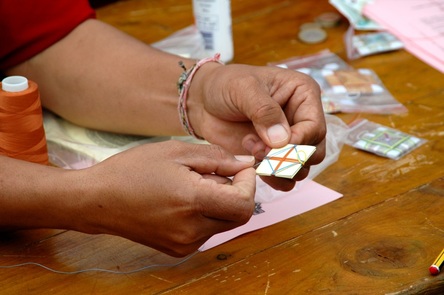
Likewise, this photograph zeroes in on a Buddhist monk’s hands as he ties a small prayer package at a festival in Wales.
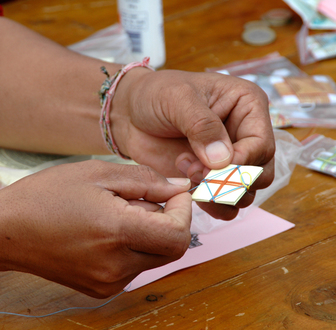
While I’m jumping ahead a bit (more on cropping in Chapter 8), I wanted to see if I could isolate the hands and the package a bit more. While I couldn’t accomplished this “on site,” I was able to do a tighter cropping during post-processing and achieved this image utilizing a square format.
Lighting can sometimes be a struggle, with the artist’s light focused on where their hands meet the canvas so to speak and their faces often in shadow. Natural light from nearby windows or the use of fill-flash can add sparkle to their eyes and bring out some detail in their face; always ask before shooting flash, though! Some artists are also sensitive about having photos taken of their art; again, checking in before shooting, especially in a studio or other private space, is always worth doing.
Parades
Parades
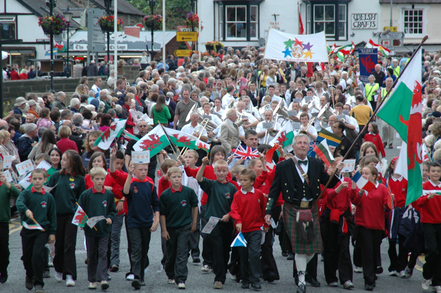
We all love a parade, or so the story goes, but talk about a photo challenge. Movement, spectators, overhead power lines, crowds, poor backgrounds, midday lighting (unless it’s an evening torchlight parade). Again, using a telephoto lens and focusing on details helps. The other technique that really helps is to get there early and position yourself at an intersection where the parade turns, facing into the parade route. The shot taken at the grand parade of the Llangolen Eisteddfod was taken from such a position. As in real estate, its location, location, location when it comes to parade photography.
Fireworks
Most of us have tried taking great photos of fireworks and probably failed. This is one instance where a tripod is almost essential – time exposures of multiple “explosions” provide the most drama and color that is very difficult to accomplish when hand-holding the camera.
Showing fireworks against the silhouettes of buildings can be dramatic as well, best shot with a telephoto lens that makes the fireworks seem larger than life. Fireworks are also an instance when a normal to telephoto lens is essential. A wide angle lens, unless you’re directly beneath the fireworks display (probably not the safest place to be), will portray the fireworks display as tiny objects. What you want is for the fireworks to be dramatic, in your face (not literally), colorful and expansive.
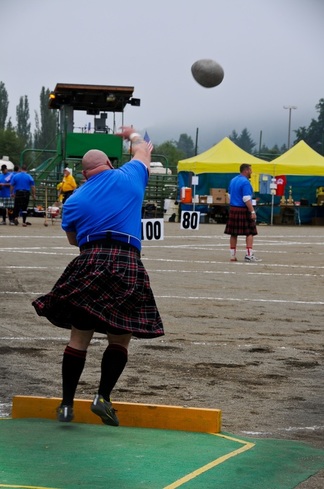
Sporting Events
Attending major league baseball parks during your summer vacation, or the World Cup in Brazil, soccer matches in Europe, Highland games in Scotland? Sporting events are a common element of vacations and can provide lots of photo opportunity and, as usual, challenges. At formal events in large stadiums, you will be at a disadvantage to the pro photographs that have reserved spots for the “best shots,” as you are relegated to the stadium’s seats. But in many instances, there are “public areas” where you can view from locations other than your seats. Get up and move around a bit; just don’t lose your companions. A wide angle lens is great for getting the overall crowd and field shots; a zoom lens is essential for close ups of players.
As with photos in concert venues, you will usually be higher than the playing surface which can help reduce a cluttered background. Depth of field becomes a bigger issue, since the action generally is occurring a great distance from you with little ability to focus tightly on the subject (especially if moving). Again, concentrating on detail is usually your best bet when possible.
Most of us have tried taking great photos of fireworks and probably failed. This is one instance where a tripod is almost essential – time exposures of multiple “explosions” provide the most drama and color that is very difficult to accomplish when hand-holding the camera.
Showing fireworks against the silhouettes of buildings can be dramatic as well, best shot with a telephoto lens that makes the fireworks seem larger than life. Fireworks are also an instance when a normal to telephoto lens is essential. A wide angle lens, unless you’re directly beneath the fireworks display (probably not the safest place to be), will portray the fireworks display as tiny objects. What you want is for the fireworks to be dramatic, in your face (not literally), colorful and expansive.
Sporting Events
Attending major league baseball parks during your summer vacation, or the World Cup in Brazil, soccer matches in Europe, Highland games in Scotland? Sporting events are a common element of vacations and can provide lots of photo opportunity and, as usual, challenges. At formal events in large stadiums, you will be at a disadvantage to the pro photographs that have reserved spots for the “best shots,” as you are relegated to the stadium’s seats. But in many instances, there are “public areas” where you can view from locations other than your seats. Get up and move around a bit; just don’t lose your companions. A wide angle lens is great for getting the overall crowd and field shots; a zoom lens is essential for close ups of players.
As with photos in concert venues, you will usually be higher than the playing surface which can help reduce a cluttered background. Depth of field becomes a bigger issue, since the action generally is occurring a great distance from you with little ability to focus tightly on the subject (especially if moving). Again, concentrating on detail is usually your best bet when possible.
|
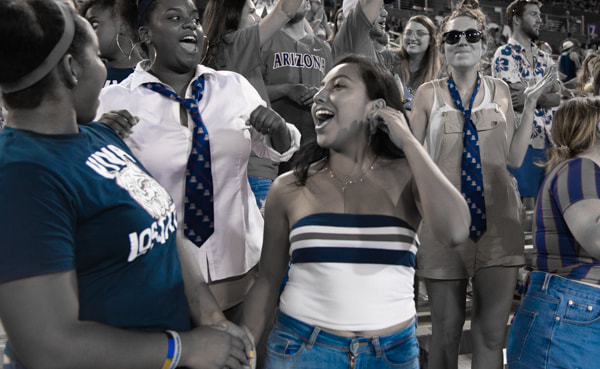
Crowd shots can also be done in a more detail manner, such as spectators at a football game. In this particular instance, I wanted to emphasize the blues, so I desaturated all other colors in post-processing.
|
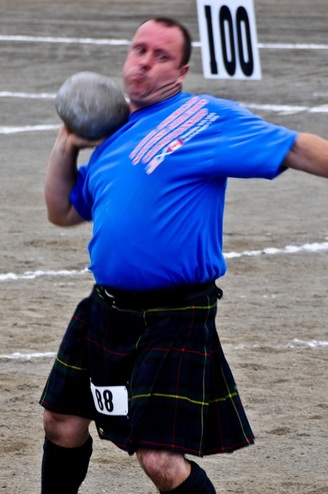
Less formal or smaller events, such as Highland Games, provides you with more flexibility in moving around and getting closer to the action. Since nearly all sports involve action and intensity, great sports photography conveys that action and intensity. I try to isolate the action to the extent I can and prize those shots that show the intensity (often strain) on the player’s faces as well as ones that show motion.
I usually take a combination of static and motion shots to see what works best in a given venue and time of day.
Food and Lodging
Food and Lodging
OK, most of us have taken photos of the Thanksgiving turkey at the dinner table. But more and more I’ve seen folks take their iPhones out and take pictures of their dinner plate (before eating, thankfully). While the food may have been artfully plated, the photograph will fit into the documentary category. And nothing wrong with that – documentary photography is certainly a part of travel photography; how you traveled, how the locals of the places visited live.
Food photograph, like fashion photography, is all about styling and lighting and far beyond the scope of this book. Suffice to say that attention to detail, framing the photo to avoid extraneous items (like unfolded napkins, happy hour pricing lists), and emphasizing shapes and colors are your best bets. These shots are best reserved for your personal family memories, rather than generally sharing unless it’s a really unique situation.
Food photograph, like fashion photography, is all about styling and lighting and far beyond the scope of this book. Suffice to say that attention to detail, framing the photo to avoid extraneous items (like unfolded napkins, happy hour pricing lists), and emphasizing shapes and colors are your best bets. These shots are best reserved for your personal family memories, rather than generally sharing unless it’s a really unique situation.

Same goes for photos of places you’re staying. An environmental photo of your hotel, pool and nearby ocean can be cool, but photos of rooms, etc. are best left to travel magazine photographers with lighting and stylists (for the rose petals in the shape of a heart on the bedspread). The only exception that I’ve taken is of a ryokan room on Miyajima Island, Japan.
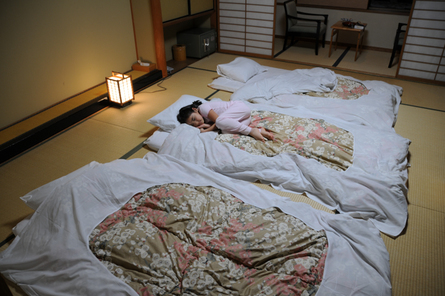
The simplicity of the room set up on arrival; and then the room made up for sleeping with the placement of futons on the floor, was something unique in my personal experience and I felt I was worth recording and sharing.
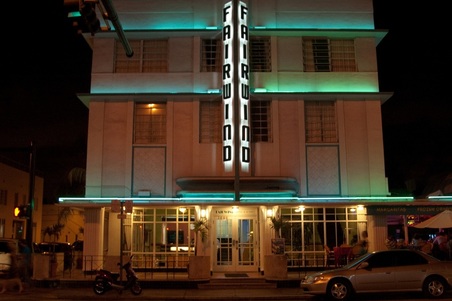
And if your motel has great neon signage, don’t miss the photo opportunity!
Art Work
We’ve all done it. We’re walking around a museum and see a painting or sketch we like and take a photo of it (hopefully with flash turned off and only taking photos if allowed by the museum). We get home, uploaded onto our laptop and, yuck, there’s this off-color, crooked photo of an art piece that looks nothing like it did in person. We either delete it or ignore it for time immemorial. And even if we do like it for the memory it creates, we’re loath (or should be loath) to share it with friends and family. It’s best to just buy a postcard or print of it in the museum store if it’s something we really want to remember and share.
But, that’s not to say that museum or gallery photography is a lost cause. Far from it – you just need to turn it into something special by working with the space and the viewers. I find the most effective technique is to include people in the photo. People provide a sense of scale, a point of interest and helps draw the viewer into the photograph. The museum or gallery space itself can be of interest – grand staircases, huge rooms, the spacing or confinement of the art works all are at play. By expanding the point of view, you can play off the design of the space.
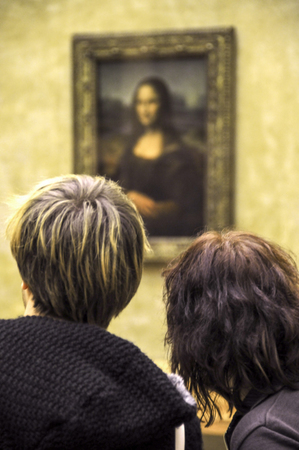
The art work itself, of course, must be included so that the viewer knows what’s happening but can be almost secondary in many instances, especially if it’s a well known piece like the Mona Lisa. You’re never going to match the specific characteristics of the painting, so focus instead on the setting and your fellow museum goers.
Vacationer’s Bain – The Weather
OK, to state the obvious: the weather is what the weather is. Landscape photography, in particular, is “weather-based,” with the image greatly influenced by clouds, sun, shade, shadows, fog, rain, snow, sleet, and heat and humidity. But when you’re traveling for a limited period of time, its best to accept the weather and adjust your photographic subjects accordingly. Here’s a quick cheat-sheet of what subjects work best by weather type.
OK, to state the obvious: the weather is what the weather is. Landscape photography, in particular, is “weather-based,” with the image greatly influenced by clouds, sun, shade, shadows, fog, rain, snow, sleet, and heat and humidity. But when you’re traveling for a limited period of time, its best to accept the weather and adjust your photographic subjects accordingly. Here’s a quick cheat-sheet of what subjects work best by weather type.
Sunny days
- Landscapes near sunrise and sunset
- Scattered clouds late in the day can make great shots
- Storm clouds on the horizon can add drama to many images
- Close-ups midday without sky
- Indoor shots midday
Overcast Days
- Good for portraits – no shadows
- Good for garden shots – reduces “hot spots” on leaves, for instance. Minimize the amount of sky in the photo, since it’s usually pretty washed-out.
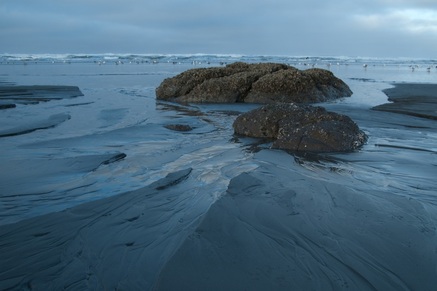
- Monochromatic landscapes - where sea and sky blend
Rainy days
- Landscapes without skies or with only minimal band of sky
- The colors of flowers and other landscape elements can “pop” just after a rain
- Street photography
- Umbrellas can be colorful!
- Standing under awnings and concentrating on passersby, with attention to graphic elements (possible conversion to black and white during post-processing)
- Wet streets can also “pop”
- Indoor shots
- If hot and humid – give time for lens to un-fog
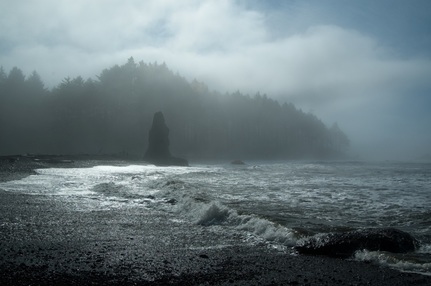
Fog
- Ideal time for monochromatic photos
- Not about color, but about mood and graphic elements
- Ethereal; often with no horizon for orientation
Keep in mind that there are always photo opportunities, regardless of weather, activity or time of day. Being prepared for these eventualities can help you respond quickly and create better photos. And be especially prepared for the icon shots, the subject of Chapter 6.
