Chapter 7: simple guidelines for better photographs
While this site is not meant to be a detailed discussion of photo composition or to cover all the technical basics of photography, it is still important to point out some of the common “rules” that generally result in better photographic composition. As with all rules in photography, there are times when you will want to break them in order to get the image that you visualize. There are two keys to breaking rules – the first is to know what the rule is and the second is to break it with gusto!
Simple Rule #1 – Rule of Thirds
Simple Rule #1 – Rule of Thirds
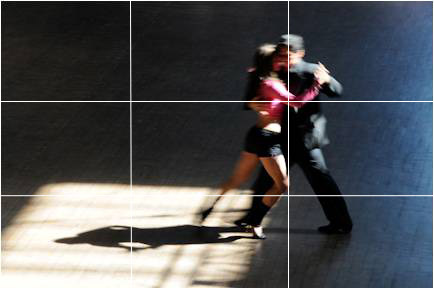
When it comes to composition, whether in photography or painting, it is generally preferable not to place the subject directly in the center of the frame. Dividing the frame into thirds horizontally and vertically and placing the subject in one of the four intersection points usually creates a stronger image. Of course, breaking the rule and placing the subject in dead center can work, especially in a portrait (but not always).
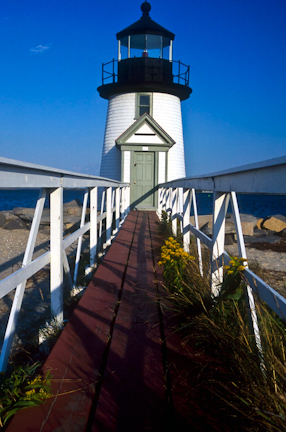
Following the rule, the main subject of the dance photograph is at the upper right intersection of the “thirds.” In the Nantucket lighthouse photo, the subject is centered for dramatic effect and includes what is referred to as a leading line – the boardwalk handrails taking the viewer into the heart of the photograph, basically dead center.
Simple Rule #2 – Foreground, Background, Middle Ground
Our eyes oftentimes screen out extraneous objects; the camera does not. So I highly recommend looking at all of the edges of the photo-to-be, noticing “extraneous” objects around the edges and adjusting the zoom or walking closer to the subject to eliminate such objects to the extent you can. Then look at the subject and the foreground (what’s between you and the subject that appears in the image) – does the foreground add to the interest? Or does it distract? Same goes for the background (behind the subject) – does it add to the interest or distract? If you can recompose the image to eliminate distractions, now’s the time. You can also adjust the aperture to soften the focus of the background (or foreground for that matter), increasing the attention paid to the subject. If you look at the photograph taken in Grand Teton National Park at the end of Chapter One, you’ll see that the grassy foreground ties in both sides of the road. The road itself leads to the Tetons. The sky (the background in this instance) has interest of its own that also leads (points) to the road. This is the essence of composition – tying all of the elements of a image together so that they all have purpose.
Simple Rule #3 – Have people or objects ENTER a photograph, not leave
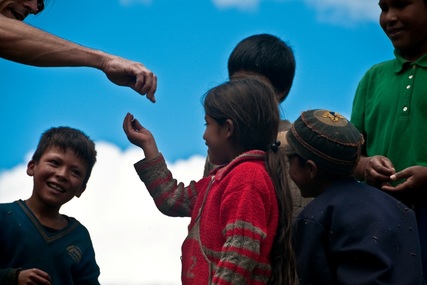
Generally, it’s best for a person or object (such as a bicycle or car) to be seen entering a frame and looking across the frame. This implies movement and draws the eye across the image. If the subject is at the edge heading or looking out of the frame, the implication is that something has already happened or is happening outside of the image and leads the viewer out of the frame too fast. Breaking the rule, though, can add tension to a photograph which may fulfill the photographer’s intent. All elements of this shot lead inward and create a good feeling all around.

The photograph of the Venetian mask, though, reinforces the mystery that the mask itself implies by taking the viewer quickly outside of the frame into the unknown.
Simple Rule #4 – Keep the horizon straight
Simple Rule #4 – Keep the horizon straight

The mind knows that the horizon is straight and expects an image to match that preconception. A straight horizon shows that the photographer cared and exercised proficiency. Being off by even a little bit can be jarring. Many cameras, especially DSLRs, have an option that superimposes a horizontal and vertical grid in the optical viewfinder, making it easier to get the horizon straight. While adjustments can be done during post-processing, it will result in loss of a portion of the image when cropping.
If you are going to break this rule, not unusual in fashion and style photography, do so BIG TIME. Being off by a degree or two just doesn’t cut it. Being off by 10 or 20 or more degrees shows intentionality. While the viewer may question the reason why the photographer did this, they will at least know it was done on purpose. As with rule #2, breaking this rule can enable the photographer to create desirable tension in an image.
If you are going to break this rule, not unusual in fashion and style photography, do so BIG TIME. Being off by a degree or two just doesn’t cut it. Being off by 10 or 20 or more degrees shows intentionality. While the viewer may question the reason why the photographer did this, they will at least know it was done on purpose. As with rule #2, breaking this rule can enable the photographer to create desirable tension in an image.

Books lined up on a bookshelf, such as the one above, almost demand parallel and straight lines. Fashionista shots, however, often want to throw you off balance and emphasize a more graphic quality such as this photo of two young women.
Simple Rule #5 – Sharp Focus
When it comes to landscapes and eyes, sharp focus is pretty much the expectation. A purposely blurry image can create a dream-like mood, but it needs to be intentional, not the result of carelessness on the part of the photographer. The auto focus feature on nearly all lenses these days usually helps, though not always. Sometimes the sensors focus on the wrong object; a slow shutter speed or an unsteady hand can also result in unintentional blur.
If only one portion of a person or animal is in focus, it must be the eyes. If the entire person is out of focus, for instance a dancer in motion, then the eyes don’t need to be in focus either. But otherwise, the eyes really need to be sharp.
Selective focus, meaning that key elements of the photograph are in focus while other elements such as the foreground or background are out-of-focus, is an important technique. A busy background can distract from the subject; rendering an out-of-focus background allows the subject to be more dominant in the frame. Understanding depth of field and the ability of your camera and lens to create the depth of field is an important skill for the photographer.

In this photograph taken in Puerto Vallarta, the parachute, the parachutee, and the tow rope are all sharply in focus. This is also another good example of the rule of thirds – with the parachute in the upper right; and a leading line – literally – leading from the lower left to the subject.

This photograph of votive candles in the Temple of Maximón in Guatemala focuses on the nearest candle while rendering the remainder of the candles – and their flames – in a more surreal way for a more interesting overall image.

Finally, this photograph of a Hindu priest moving toward the light of the door was purposely shot to show motion – nothing need be in sharp focus. The shutter speed was just slow enough to convey the photographer’s intent but not so much as to render the photo as unintelligible.
Simple Rule #6 – Proper Exposure
The closer you get the exposure to be right on the mark, the better the information that is recorded by the camera. During post-processing and using a program such as Lightroom, you can often change the exposure by up to 3 stops of light (sometimes more). But, the aim should still be to get the exposure pretty much correct in camera which assures the optimal use of the recording data.
Overexposed shots look washed-out, while underexposed shots lose detail. A slightly underexposed shot, though, can often appear to have more saturated colors. I often underexpose (using the +- dial on the camera) by 1/3 or 2/3 of a stop when shooting outdoor photographs to improve the color saturation. I could do this (and often do) during post-processing, but again I like to get the image right to begin with.
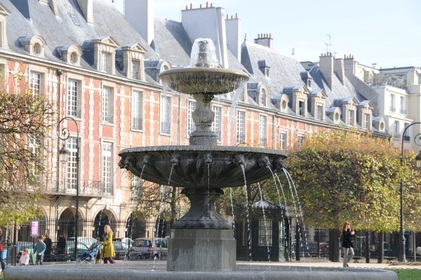
This photograph taken in Paris was shot in harsh midday light and is somewhat washed-out in appearance.
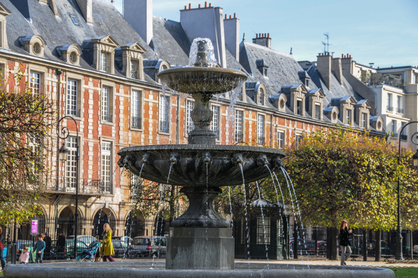
In Lightroom, I adjusted the exposure, saturation, brightness and contrast and ended up with a much more pleasing photograph.
Simple Rule #7 – Bring along enough digital media or film
How obvious can one get, right?! Be sure to have enough memory cards or film for your journey. Even if you download your photos every night, I recommend not erasing the memory cards until you get home and have your laptop files backed up on an external drive or stored in the “cloud.” Things can and do go wrong with both hard drives and memory cards, so relying on just one while traveling can result in major disappointment later on. If you have not traditionally shot in RAW format (see discussion in Chapter 4), remember that it results in much larger file sizes and the need for more or larger memory cards. I also suggest multiple, smaller memory cards (8-16 MB each) in case of card failure which, as I said, does happen.
And now on to post-processing in Chapter 8.
