chapter 3: equipment
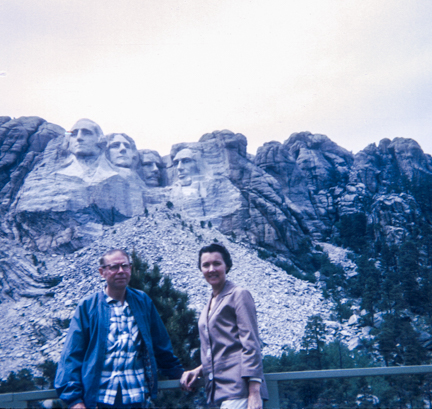
The most important component of photography is the photographer’s eye – what you see and compose matters more than the tools used to capture the image in the mind’s eye. One of my first shots, taking at age 12 or so, is at Mt. Rushmore with my parents using a Kodak Instamatic camera. Not bad considering midday light and an overcast sky; and you can actually see Mt. Rushmore!
You’ve probably heard the saying “the best camera is the one you have with you.” Good advice. ALWAYS have a camera with you when traveling – and these days, smart phone cameras are pretty darn good. You never know when a photo opportunity will arise.
You’ve probably heard the saying “the best camera is the one you have with you.” Good advice. ALWAYS have a camera with you when traveling – and these days, smart phone cameras are pretty darn good. You never know when a photo opportunity will arise.
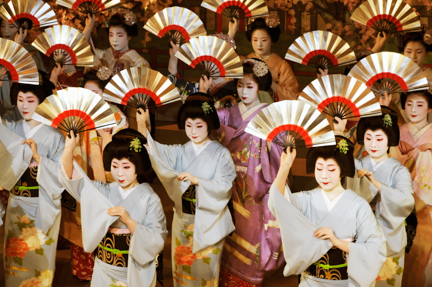
Decades later, when in Kyoto near the end of a two week journey, we were headed out to see a “Geisha” show at a theater in the Gion district. Having taken plenty of photos already on this trip, I was thinking about skipping the camera this time since theaters never allow photographs during performances. But, since we’d be walking through the Gion, I convinced myself to take along my 35mm DSLR. And was I glad I did! As soon as the performance started, nearly everyone in the audience took out their cameras and fired away (sans flash, of course). I quickly followed and ended up with some truly spectacular shots. Had I left the camera behind, I probably would have been depressed throughout the show as well as missing some great shots, though I may also have paid more attention to some of the finer aspects of the dance.
The Camera
So, the lesson here is to always have a camera close at hand when on the road. Next, what kind of camera? Digital technology continues to evolve at a very rapid pace, with the major manufacturers, including Nikon, Canon, and Sony, introducing new models on a regular basis. There are three basic types of cameras: the smart phone, the point-and-shoot, and the DSLR or digital single lens reflex camera (including mirrorless cameras). With the vast improvement in smart phone cameras in the past year or so, they can basically replace the point-and-shoot camera as your “always with you” camera. While your vision is the most important factor in creating a great image, a camera is an important tool in the process and a DSLR is still the ideal for travel photographers.
My basis rule of thumb when it comes to cameras and accessories is the same as I have for packing in general – travel light. I bring a good quality DSLR (I currently use the Nikon D750), a good quality wide-angle to telephoto zoom lens (such as the Nikkor 24-120), a couple of filters (UV and Polarizer), lots of memory cards, a spare battery, and then my camera phone (iPhone) as the “always with you” camera. The DSLR, lens, filters, battery, battery charger, and memory cards fit in a compact camera case and the smart phone fits in my shirt pocket. This selection of equipment is simple and capable of taking just about any photograph I can envision. It is also important to bring your camera manual (at least the summary version of it) along with you on a trip. Digital cameras have so many settings and options that may come in handy during a trip that it’s a good idea to be able to refer to the manual to get the photograph you envision.
When you’re ready to purchase a DSLR, the following factors are worth considering:
Cost
DSLRs range from around $500 to upwards of $5000. Oftentimes, camera stores and manufactures offer camera body and lens packages at a fair discount. But be cautious about the lens – I highly recommend purchasing a lens made by the camera body manufacturer. The lens is the most critical component of any camera, and the better the lens, the clearer and sharper will be the resulting image. Given the advancing photographic technology, your lens with likely be with you far longer than the camera body. When buying a DSLR, and you have to make financial choices (don’t we all!), spend the money on the lens.
ISO Settings and Image Quality
Check out on-line reviews of camera equipment, especially discussions of the ability of the camera’s sensor to record images in low light without flash, and discussion about the quality of those images. Same goes for the image quality of the lens you’re thinking of purchasing.
Megapixels
I don’t know if the megapixel wars are over yet or not, but 12-16MP seems usually results in excellent prints as large as 16” x 20”.
Viewfinder and image screen
Traditional DSLRs have both an optical viewfinder and an image screen. While I prefer using an optical viewfinder when composing and taking a photograph, times and preferences change. When considering a mirrorless DSLR, the screen becomes of critical importance. A high quality, high resolution digital image screen is important in reviewing shots and doing in-camera editing and many use it for composing their photos as well. And it makes for great and immediately sharing of images of those who you’ve “shot.” The downside is that the screen is often difficult to see in bright light.
Photos and video
The current crop of DSLRs, as well as your smart phone, include video capabilities as well. And given the great lenses and controls on a DSLR, there is the potential for great video. So, if video capabilities are of interest to you, look for a camera body capable of both still photographs and video.
Feel and weight
Before you buy, hold the camera in your hand; feel the weight and the sturdiness. Feel how it is to click the shutter while holding the camera in both the horizontal and vertical directions. Feel where your fingers touch the control dials. A great-feeling camera is more likely to be used. I loved the feel of my old Nikon F100 film camera and was thrilled when the Nikon D300, and later the D750, came out with a similar feel. Keep in mind what it will be like to carry the camera and, perhaps, an additional lens (or two) all day.
Brands and Lenses
As mentioned earlier, the lens is the most important component of a DSLR. The quality of the glass, the number of glass elements (especially in a zoom lens), and the inclusion of vibration reduction technology all effect the sharpness of the photograph. Take a look at lens reviews at sites such as www.bhphotovideo.com (a major camera retailer serving both the amateur and professional photographer). While lenses made by lens-only manufacturers are of much higher quality now than in years gone by, I’m personally biased in favor of lenses designed and manufactured by the camera makers given the importance of integrating the lens into the overall device I’m using to record an image.
Canon and Nikon have been, and continue to be, the major names in both film and digital cameras and their lenses are of the highest quality. Sony has recently built up quite a reputation for high quality mirrorless digital cameras as well. It’s important to consider that each of the major camera manufacturers has its own lens-to-camera connections that are not readily interchangeable. So, it is wise to stick with a camera and lens brand over time, especially if you will be using multiple lenses or upgrading camera bodies from time to time.
You’ve probably noticed that I have not mentioned film cameras. Point-and-shoot film cameras are no longer manufactured, and there are only a couple of film SLR cameras still commercially available. One-time use cameras, especially for underwater photography, are about the only film cameras that most travelers are likely to use today.
Lenses
Lenses fall into two primarily categories – fixed lenses and zoom lenses. Fixed lenses are generally of higher quality with fewer lens components and are usually faster (that is, capable of taking in more light in less time). For instance, a 50mm f1.4 “normal lens” is considered a very fast lens, as is a 200mm f2.8 lens. Less expensive lenses, though still of high quality, are likely to be in the f3.5-f5.6 range.
Wide angle (under 50 mm)
- Good portrait lens
- Great with interesting sky
- Watch sharpness in foreground
Normal (50-70 mm)
- What eye typically sees
- Good for head-on shots
- Often a very fast lens

Telephoto (70-200 mm)
- Good for detail
- Good for being inconspicuous
- Usually a slower shutter speed (or an expensive lens!)

Extreme telephoto (over 200 mm)
- Good for specific detail
- Good for sports; compressing distance
- Difficult to hand hold; many require a tripod to prevent blur
- Tend to be very expensive
DSLRs are equipped with digital sensors – the heart and soul of the camera. The sensor converts the optical image into an electronic signal. A “full size” sensor is equivalent to film in a 35mm camera. Most digital cameras have a sensor that is smaller than that. My Nikon D300, for instance, has a digital sensor 1/3 smaller than the full size sensor. Because of this, a 50mm lens will actually record data as though it’s a 75mm lens (1/3 less than 75 is 50). The 18-200 zoom lens that I typically used was equivalent to a 27-300mm zoom lens. Why the small sensor size? Cost! The sensor is perhaps the most expensive component of a digital camera and the full size (35 mm equivalent) sensor is usually found only in high-end, professional equipment (such as my Nikon D750). The smaller sensor also means that less information is recorded than with a full size sensor; this impacts the size of photo enlargements that may be possible with a given camera-lens combination, though I have no problems making high quality 16”x20” prints.
One other quick note: you will see lenses advertised “for digital cameras.” This means that the lens is designed for use with the smaller digital sensors, rather than a full size sensor. Any Nikon lens, for instance, can be used on any smaller-sensor Nikon DSLR. But a Nikon “digital” lens should only be used on the smaller-sensor cameras. If used on the full-frame Nikons, there will either be considerable vignetting since the lens is not capable of transmitting enough information from around the edges to fill the sensor or, with the proper camera setting, use of a smaller portion of the sensor, somewhat reducing enlargement possibilities).
Zoom lenses cover a variety of focal lengths and are generally of three categories. Wide angle to semi-telephoto (18-70 mm is a common size); semi-telephoto to long-telephoto (70-200 mm) and what I call all encompassing (18-200 mm).
I prefer using just one lens for several reasons – it’s always ready (assuming I have the camera with me) – no need to change lenses to “get the shot.” Given the sensitive nature of digital sensors, there’s the possibility of getting dust on the sensor each time you change lenses, especially in outdoor settings. I’m also carrying less gear, therefore less weight and fewer things to misplace. Many lenses have vibration reduction technology that allows you to hand-hold at slower shutter speeds than before. I recently reviewed the focal lengths of 600 or so photos that I took during the first portion of a trip to India. 40% were wide angle (18-50mm); 20% mid-range (50-100mm) and 40% telephoto (100-200mm), demonstrating the usefulness of a wide angle to telephoto zoom lens.
If I were to have more than one lens to carry (and I do, though I rarely use them for travel, I would recommend a fast wide angle lens (15-20mm f1.4 or so) or a fast normal lens (50 -55 mm f1.4). These would give you more flexibility in low-light situations.
Filters
Hundreds of filters are made for SLR cameras ranging from ones that eliminate ultra violet (UV) rays from reaching the film or digital sensor to specialty filters that create star shapes when photographing light sources as night. With post-processing options available in programs such as Lightroom, Photoshop, and Photoshop Elements, there’s little need for most filters at the digital capture phase (tech speak for when you click the shutter).
The two exceptions are a UV filter and a polarizer filter. The former is important for two reasons. UV rays can sometimes slightly – very slightly – dim an image. Use of a UV filter can result in truer colors being recorded in outdoor settings. The second reason is actually more important – to protect the lens in case you accidentally bump the lens against an object. It is much easier and much less costly to replace a $50 filter than a $500 or $2500 lens.
A polarizer filter can be useful in two ways. The first is to intensify skies – makes blues pop and creates greater differentiation between clouds and sky. Some of this can be done in post-processing as well, but I like the degree of control that you get from adjusting the polarizing filter (it is comprised of two pieces of glass that can be rotated to control the amount of polarization). It’s also very useful when taking photos of water or taking photos through a window with glare; the polarizer can reduce or eliminate glare in many instances. It’s a relatively expensive filter, but one I highly recommend for vacation photography, especially if doing a lot of outdoor activities or landscapes. The one downside is that you can lose up to two stops of light when using the polarizer. This means that a shot that would have been f8 at 1/50 second is now f8 at 1/12 second, and much harder to handhold. Always something, right? I keep the UV filter on my lens at all times EXCEPT when I'm using the polarizer. In this case, I replace the UV filter with the polarizer to minimizing vignetting.
Flash
Most point-and-shoot cameras and many DLSRs come with built-in flash features as do many smart phone. Some pop-up while others, especially with point-and-shoots, are right there in front, ready to go off when asked or automatically when the built-in light meter says it’s needed. The first thing you need to know is how to TURN OFF the flash. I don’t know how many museums I’ve been to where there are clear signs saying “No Flash Photography” and all of these folks with automatic point-and-shoot cameras are flashing away. I’m also amazed when watching evening football or baseball games on TV and seeing all of the flashes going off in the 300 level of the stadiums, as though the flash from ANY camera from that distance will have ANY effect on the image. Nearly all cameras have a way of turning off the flash – know how to do so!
OK, enough of the negatives. Flash can be an important component of a great photograph, especially “fill flash.” Fill flash means adding “some flash” generally to light up people’s faces when they would otherwise be in shadow. A little bit of flash will make the faces visible without affecting the mountain scenery in the background. DSLRs almost all have the means of adjusting flash output (flash power). And nearly all are capable of having an external flash attached to the camera. Many have the ability to control one or more off-camera flash units as well; this means hand holding or tripod-mounting the external flash some distance from the camera. For most vacation photography purposes, the built-in on-camera flash is sufficient, especially when providing “fill-flash.” Learning how to adjust the flash output is an important thing to do when experimenting with a new camera. While I have a nice auxiliary flash unit, I rarely use it when traveling. It’s more for use doing portrait-style work or when taking pictures of family opening holiday gifts or sitting down at the Thanksgiving table.
Memory Cards
Memory cards (or film) – take far more than you expect to use – and you will likely use them all! The amount of memory needed will vary depending on a)the megapixels of your camera, b)whether you are shooting RAW files or JPEGs (will be discussed in chapter 5), c)whether you will do nightly edits or will be downloading photos onto a storage device on a regular basis and d)how prolific a shooter you are. With a 10MP camera, shooting in RAW format, I took just under 2000 photographs while in India and used 26 GB worth of memory cards. Yes, I edited nightly which eliminated perhaps 5% of my shots and, yes, I downloaded the photos every evening to a laptop. But I did not delete the photos from the memory cards until after I was home and had a second back-up copy made of all of the photo files. With camera sensors now in the 15-24MP range, even more memory is needed. And if you're shooting video as well, the memory needs increase logarithmically.
One caution about larger memory cards, say in the 32-64 GB range. Memory cards do fail – not often – but sometimes. And I’d rather lose an afternoon’s worth of shots rather than those taken over a week or two. So I tend to use smaller capacity cards.
Other Items
A good, comfortable camera strap is a really good idea. The straps that come with cameras, even higher end DSLRs, are not generally flexible and get tiring and even painful for the user during a long day of shooting. I use a neoprene strap that is stretchy and very comfortable, even after carrying the camera around day after day. Ideally, the strap can be adjusted to reach across your chest and under one arm to avoid carrying the weight on one shoulder the whole trip.
Tripods. Do I own one? Yes. Do I take it on vacation trips? Only if it’s a road trip in our family car. I’ll usually throw the tripod in the trunk and possibly use it for a pre-sunrise or post-sunset landscape shot, though oftentimes it comes back unused. When flying, I never take a tripod anymore, especially now that most airlines charge for each piece of checked luggage. I visited Bhutan over a decade ago and had a tripod with me. I never used it, yet had to lug it from hotel to hotel. I don’t feel it’s necessary for most vacation photographers unless you have a specific shot in mind that requires a long exposure that can’t be hand held. The lights of Times Square at night can easily be shot hand-held. But a long time-exposure of star streams at night or a detail shot in the shadowy slot canyons in southwest Utah require use of a tripod. Another option is to look for level walls, ledges or other surfaces for natural stability when necessary. And a small beanbag can also work!
Oh, and always carry a spare battery for your camera, the battery charger if a rechargeable battery, and extra batteries for any accessory flash. And if traveling abroad, bring any necessary adaptors for your battery charger.
Boats (canoes, kayaks, sailboats, powerboats) are often features of vacations. Photographs of folks on the water and of landscapes from the water are part of the travel documentary experience. Unless the camera is a disposable waterproof model or enclosed in a special water-tight housing, cameras don’t do well when dunked! Having your DSLR camera is a dry bag (obtainable at most outdoor outfitting stores or marine supply stores) is a good and relatively inexpensive option. And keep your eye out for the rogue wave.
So, with equipment in hand, its time for the trip itself, the topic of Chapter 4.
