chapter 8: after the trip comes the fun part!
So, how many photos did you come home with? Certainly hundreds, perhaps several thousand! Well, first of all, relax, get back into your daily routine and catch up on those necessities of life, like paying bills. The only important photographic step at this point is to download your photographs from the memory cards to your computer's hard drive and then to a second external drive, a thumb drive, or to a cloud-based service such as Carbonite or OneDrive as a backup. Only then should you safely reformat your media cards. Always have two sets of your original RAW files (or JPEGS if that’s what you shot). I recently had a hard drive fail and was thankful that I had two complete backups available – still a pain but at least I didn’t lose the 2000 photos from a trip to Rajasthan! Drives do fail, as do memory cards. So back up early and often.
Software Options
I use Adobe Lightroom for cataloging, editing and adjusting photographs. I sometimes augment Lightroom with Adobe Photoshop for very specialized adjustments. While Lightroom is great, it’s only available on an annual subscription basis (starting at $10/month with Photoshop). A less expensive option, but also quite powerful, is Adobe Photoshop Elements, which is stand alone software and has most of the capabilities of the full version of Photoshop. Make sure that your computer is compatible with the software, and that it has sufficient memory and computing power.
Among other software options, Apple Mac computers have built-in photo processing software. Canon and Nikon each have their own programs that are especially adept at processing their respective RAW file formats. Most if not all digital cameras come with simple programs specifically designed for the camera.
Cataloging Your Photos
Keeping track of your photographs can be quite an endeavor. The most important thing to do is strive for consistency. Most programs, such as Lightroom, will save your photographs by date (the default setting) and then number then in the same numeric order as they are stored and names in the camera. These names (such as DSC1320-2.NEF) are cryptic at best. The best time to rename files is during the importing process or immediately thereafter. Lightroom allows you to specify both the file name and the individual photo name as part of the import process. I would suggest something like “India 2012” for the file name and “India2012_xxx” for the image name, with the xxx signifying the individual photo number in consecutive order, which will be automatically assigned by the software.
Later on, you can create “collections” in Lightroom like “Best of India.” Each software program uses different nomenclature and has different degrees of flexibility in this regard, so definitely checkout what your software is capable of and make it work for you.
Editing
I use a 5-step editing process in Adobe Lightroom. First, I go through all of the photos from a trip and give a star (*) to ones that have any potential, even if a lot of post-processing or cropping work is needed. This usually results in a 20-25% reduction in total shots (not that I delete ANY shots that make it all the way back home – you never know). Then, usually on another day so as to be refreshed, I go through all of the * photos and select the better ones by adding a second star. Then back through a third time, getting more critical each time. I look for sharp focus (or the amount of intentional blur), framing, overall composition, backgrounds, and foregrounds among many factors. Finally, I go through the *** photos and add a fourth star to the really good ones. There’s a good chance I’ll be down to 2-4% of the original photos by now. At some future point, I even go through those, often after post-processing, and “award” a fifth star to those exceptional shots. Out of 2000 photos, maybe 5-10 will get to the ***** level.
Post-Processing
Nearly ALL digital photographs require some post-processing adjustments (especially those shot in RAW format) just as film does. When you took your film to a lab for processing, the automated systems made color and saturation adjustments to those photos. Digital capture is no different; most digital images have a slight grey or cloudy cast to them that can easily be removed by a variety of means, depending on the program – usually contrast and brightness adjustments; most programs have an “auto” adjustment button that improves many (but not all) images.
Basic Adjustments
Regardless of the software you are using, it’s not a bad idea to first try the auto adjustments. These adjustments usually entail changes in exposure, brightness and contrast, based on the program’s database of “similar” shots. Usually the photo is improved, sometimes drastically, through this auto process. Sometimes, though, the results are poor. All software these days have an undo or similar command.

I generally make exposure setting adjustments, followed by contrast and brightness, and then clarity or sharpness adjustments. If you shot in RAW format, some of the software programs allow you to adjust for various types of light, including tungsten, florescent, bright sun, shade, etc. This is perhaps the best reason to shoot in RAW. Be really careful of the “saturation” settings, too much saturation can cause printing headaches, especially with reds which just lose all detail and subtlety if too saturated.
This is the original photo, without any post-processing adjustments.
This is the original photo, without any post-processing adjustments.

With several adjustments, the colors and details pop!
Cropping
Only after I’ve made all of the other adjustments do I consider cropping the photo and then only if essential. It’s always best to frame the photo in your camera. Remember that if you do a major crop, the resultant image size in terms of pixels will be smaller and care needs to be taken if you then enlarge the photo, since the resolution will be less, perhaps much less, than the original file.
Only after I’ve made all of the other adjustments do I consider cropping the photo and then only if essential. It’s always best to frame the photo in your camera. Remember that if you do a major crop, the resultant image size in terms of pixels will be smaller and care needs to be taken if you then enlarge the photo, since the resolution will be less, perhaps much less, than the original file.
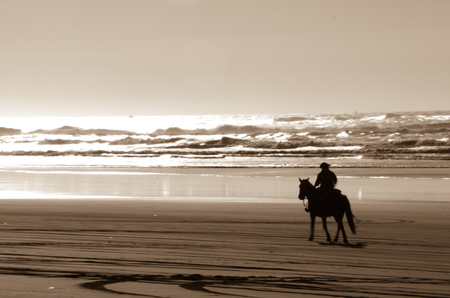
I occasionally crop an image to remove a distraction on one side or the other of a photo – either I didn’t notice when I took the photo or had no choice given distance, lens availability, etc. One of my favorite cropping “excuses” is to turn a regular photograph into a panorama. This photograph of a horseman on the beach is pretty good as is.
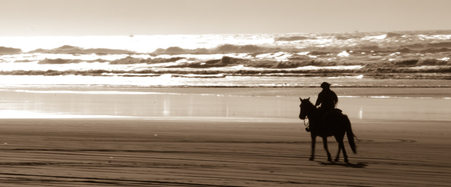
But by cropping out most of the sky and some of the foreground beach, I’ve really emphasized the horizontal nature of the photo and the horizontal bands of sky, surf, water and beach. Cropping also enabled me to eliminate most of the distracting tire tracks in the foreground. Compositionally, it also helps that the horse and rider are moving into the photograph. And, yes, I did desaturate the photograph into a light sepia tone (and I did that BEFORE cropping). Either photograph works; the final choice is always yours!
Moving/Removing Elements
Now for a word or two about moving, removing or adding objects to a photograph. Generally, I don’t do any of these, though software often allows you to do so. Again, take care when composing the photograph and try not to include things that don’t contribute to the image and that actually take away or distract. Especially look around the edges of the frame for the extraneous branch; and look at faces in the image that may have a telephone pole or tree trunk growing out of the head! The one step I do take is to remove spots that detract from the image, usually brought about by dirt on the lens, filter or sensor.
What about deleting a piece of trash, or a random plastic bottle? If you are doing pure documentation, then don’t! What’s there is what’s there, good and bad. If you plan on selling a photo to a news publication, adding and removing things from an image is an absolute no-no.
For your purely personal use, it’s really up to you. And if it’s a “fine art” piece for your wall, then be as creative as you’d like! Just don’t pass it off as untouched!
Other Adjustments
Most photo software also have some amazing adjustments that allow you to turn your color photo into a sepia-toned image, a black-and-white image (best to use the saturation sliders, rather than the black and white conversion button), even watercolor, charcoal pencil or other “art” formats. Photoshop in particular has a wide variety of such “filters” available. Most of the filters provide a variety of adjustments, such as size (how thick the pencil line or how large the stained glass “pieces”) or intensity (how saturated the color). These can be a lot of fun to try, but probably not the best idea for most of your photos.
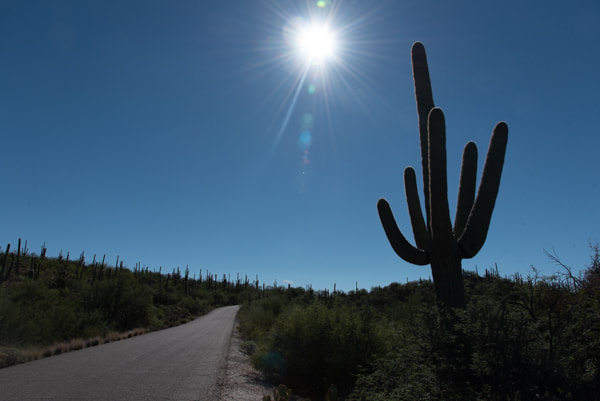
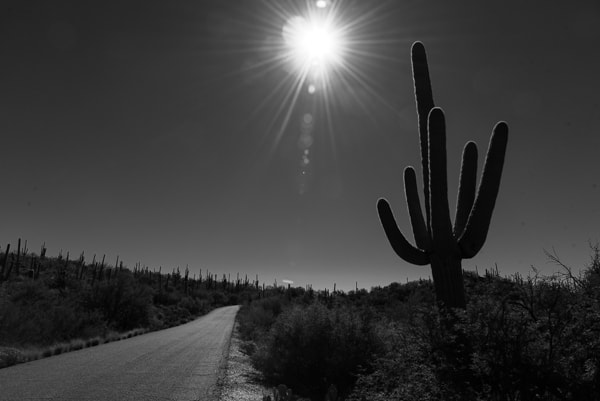
Black-and-white photos can be particularly powerful. The following photograph was made in Sabino Canyon, Tucson. While the original color photograph was well composed, it just lacked something in my view. Desaturation the blues and greens produced a more intense graphic image which is what I was seeking. And the catchlights on the saguaro arms added an important detail that was nearly lost in the color version. The great thing about post-processing software is the ability to work with an image to create that final product that furthers your vision.
|
|
